
Now, I wish I could remember how I came to understand brushes in photoshop but let me tell you once I figured it out the fun really began. A brush in photoshop is not just a line which is what I had in my head. But you can actually use the brush for symbols or the clip art type thing I was looking for a few months back. and do you know what is better than finding out how to use a brush? finding there are tons of free brushes for download!
some websites:
Obsidian Dawn
Mel's Photoshop Brushes
Photoshop Roadmap
How to use Brushes in Photoshop:
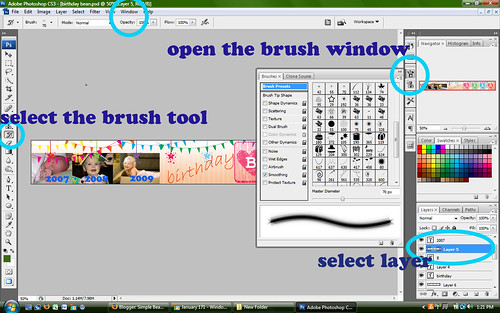
- Open the brushes window either from the icon next to the navigator window or from the the window drop down menu.
- Create a new layer, this layer must be selected in order to place the brush. Create New Layers for each brush you use. If you decide later that you don't like this brush, the color, or size it is easy to delete this one brush layer then start from scratch. I haven't figured out how to change a brush once it is placed, so having a new layer for each brush is key.
- Select the brush tool.
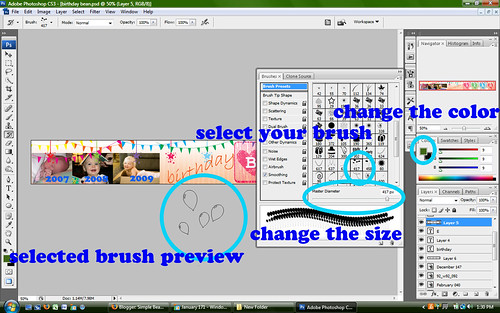
- Go back to the brushes window and select which brush you would like. If you drag your mouse over to the artboard area you can see how the brush looks and the size.
- Adjust the size if needed with the "master diameter".
- I usually pick a color I think I might like to start.
- Then click the mouse to leave the brush where you would like it on the artboard.
- If the size or color is not right then I usually hit "ctrl-V" and make the color or size change and then place the brush again. You can also go to the Edit drop down menu and select step backward (you can also do this for multiple deletions).
I just finished this header for my family blog that celebrates my 2 year old's birthday.

do you have any tips for headers in Photoshop? The steps in this tutorial assumes some photoshop experience but please let me know if you have any questions.


No comments:
Post a Comment