Friday, October 30

how to make silhouettes with photoshop

silhouettes
(I feel like this wall needs something else, ideas?)

Finally these are off my want to make list. I had the silhouettes done since May but I kept spending my craft budget on other stuff and never had enough left for the frames. Then this month I just told Gregg that the frames were not a crafty item and therefore would not come out of my crafting budget. and now I am happy to saw the project is DONE!

I love the look of silhouettes and I wanted to do make these for our living room. But really I fell in love with the idea of these as Mother's day presents (yes it took that long to share them with you). I sent one of our girl to Gregg's Mom and my mom got one of each of her 3 grandkids. I know a lot of people make silhouettes by cutting out the picture with a scalpel and paint over the picture with black. I knew this would not be a good idea for me, I would have done a hack job. So I found a couple tutorials using photoshop to make silhouettes but their techniques would just not make a black enough silhouette. This is what I ended up doing. PS. Photoshop seriously rocks and I only understand like 2% of all it can do.

How to Make Silhouettes with Photoshop

Open up picture in photoshop (I used adobe photoshop version CS3).
silhouette tutorial 1

Make a background copy of the photo. Keep this highlighted. We will be editing this picture but if we make any mistakes that are too hard to correct we can easily delete this copy and go back to the original photo.
silhouette tutorial 3

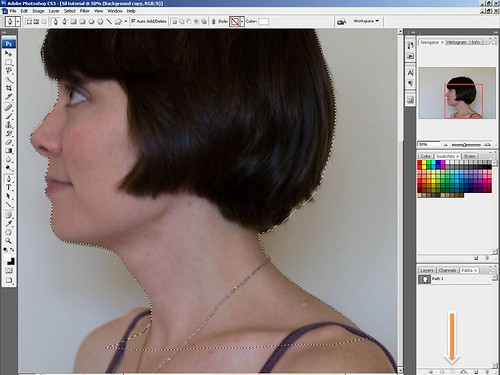
Click on the "Paths" tab. Then on the lower right corner select "create a new path." The pen tool should automatically be selected or just click on it to select.
silhouette tutorial 2

Use the Zoom slide bar to make it easier to see the details of the outline you want to make.

Decide where you want to start selecting your outline. Using the pen tool, click on your starting point. The pen tool makes straight lines between two clicks (dots). Decide where your next click or dot should go. Click spots close together around delicate parts of the outline or click spots further apart when straight lines are reasonable for the outline.
silhouette tutorial 4
silhouette tutorial 5

If you mess up a placement of a line, CTRL-Z will remove it but if you decide that you messed up 2 lines ago, it is best to delete the whole background copy and start again with a new copy.

Continue all the way around the profile. I was sitting twisted at the waist so my neck and chest don't have a proper profile. I tried to make up where they might be (see below). Then go in a semi straight line across the bottom and connect back to the beginning dot. The dots disappear and you have a continuous line.
silhouette tutorial 6
silhouette tutorial 7

Select "load path as a selection". The solid line (and everything inside) will become selected. (Path 1 must be highlighted in order to select this).
silhouette tutorial 8
silhouette tutorial 10

Click on "Layers" Tab. And select a new layer.
silhouette tutorial 9

Go back to your path tab. Put black color as your foreground color by clicking on the double arrow (if black is one of the colors available to be selected here). Then select "fill path with foreground color" in the bottom left corner of the Paths tab.
silhouette tutorial 12

Click on Layers tab. Our filled path selection is automatically placed in the new blank layer. Deselect both background layers.
silhouette tutorial 11

A silhouette! Now save your silhouette as a jpeg. (The checkerboard background is just saying the background is blank when you save this as a jpeg and print the picture it will be white or whatever color paper you print this on.)


****

Take picture on solid background for ease of outline.

If you are doing multiple silhouettes, take the picture all landscape or profile views if you want to hang them in the same direction.

Sit upright, good posture! and have your whole body facing the same direction, not twisted from the waist. Just makes it easier to get a good silhouette. I was twisted at the waist. Look at the silhouette from the tutorial above...I look like I am sticking my chin out

silhouette tutorial 9

then I redid it making up the chest and the back for what I thought it should have been by shaving off my shoulders. so much better!! (I wonder if my neck really looks like that?)

silhouette tutorial 13

Final silhouette!

final silhouette


Hope you have a good weekend and Halloween! We already went trick or treating last night as per central PA rules, isn't that crazy??!!! Do any other places have a different night that Halloween is observed on? California and Oregon sure didn't.

Thursday, October 22

my mom's birthday

Oh my gosh, I was getting so annoyed with blogger the other night because I couldn't figure out why I couldn't get to any of my posts by their individual links. The posts would come up any other way except by their own links! So after much frustration and emails from blogger, I actually read a help file in blogger that suggested I uploaded my html template backup file. So I did. and now the links work...(light bulb comes on) I remembered a few weeks ago I was messing around with the blog template trying to do something, can't remember now. So, oooops! sorry blogger, you are a nice blog host!

When my mom was here, it was her birthday!!

Her gift included:

a small tea pot wall hanging (pattern here)
tea pot wall hanging

this was fun to make and I used our favorite colors and fabric scraps that were from special projects from the past except that orange lid. I knew it wouldn't look right but I thought just maybe (insert sewing here), dang it! but I didn't realize how much I didn't like it until the whole thing was done (insert laziness here). Mom's have unconditional love, right?


quilted coasters (project found in last minute quilted gifts)
quilted coasters
again these fabrics were from projects past

travel bag/ gift wrap
I put her gift in a travel bag (project found in weekend sewing), that also served as the wrapping paper. I am pretty pumped about that travel bag project. I made one for my dad too in his favorite colors (also matches his suitcase). He was really happy with his travel bag, awesome for a guy that I would normally never attempt to make a gift for.


My mom's birthday was when I was actually in Chicago so we celebrated the next day with her favorite cake:
oreo banana cake

Layers of whipped cream, sliced bananas, crushed, and whole oreos. Kept in the fridge for a cool and REALLY GOOD cake!

Mom, thank you for celebrating your birthday with us, you are the BEST!

Tuesday, October 20

Chicago knitting!

I am still here! Things have been busy and fun. First, my parents have been visiting since last week. They are leaving tomorrow, so sad. Their visit has gone by entirely too quick especially because a few of the days I went to Chicago for work. Gregg was gone for the past 3 weeks doing an away rotation (I can't remember if I have mentioned here that he is in med school?) so our girl was left by both of us to be spoiled by Grammie and Grampie. I was spoiled too, I love flying places without her. So much less stressful when she is not sitting (or rather spazzing out) next to me in the plane. I think I am still traumatized from our last plane trip together (although I have plans to take her on my next work trip to....ANAHIEM! hmmm, I wonder what we will do there???). So with all that relaxing time on my hands in my travels I did some knitting!

Felicity hat:

October 183
(we're winking)

felicity hat

HELLO!! Freakin' love this hat. I started this hat here and finished it in Chicago, thank goodness, it was so cold over there.

felicity hat

Mods are listed in my raverly page as is the link to the pattern page.

Yarn: I used Berroco ultra alpaca yarn in the colorway tiger's eye mix. I feel like such a broken record, this colorway is almost the same as my lovely dark gold healther Cascade 220. I love these colors. I had narrowed down the Berroco to the tiger's eye and the most wonderful dark pea soup color but I just couldn't deny that brown/reddish/orangey goodness. Maybe I should have branched out? or maybe I should just make another one? maybe next year...


Instant Gratification Scarf:
instant gratification scarf

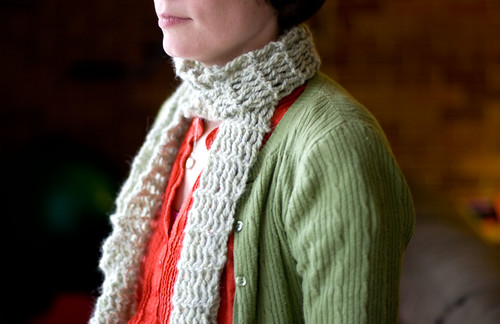
This scarf was super easy just like the name suggests (pattern here). The look is great very lacey, even with some ultra soft bulky yarn. I got a great deal on some misti international bulky yarn. I have been wanting to try knitting with this stuff, it is like touching clouds! (rav project page) This is a gift but I have a plan for one for me!
instant gratification scarf

Mitered Kitchen Towel
hanging towel

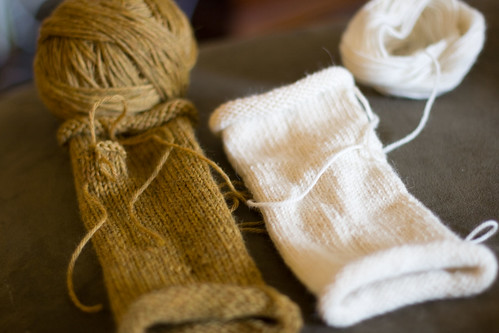
This was fun for a few rows then I got over it. It seemed like it took forever and lets face it, its a k i t c h e n towel.
Pattern: mitered hanging towel


One more thing...I am a WINNER! I was pumped to have received this in the mail...
winner! winner! winner!

I won a giveaway that Lyanna was having for her birthday! (how nice was that to do a giveaway on her day???) Thanks Lyanna!

see you soon!

Monday, October 12

buttons and toasts

It is getting colder here, perfect timing for JoAnn's to have buy one get one on buttons (ps. they also had tons of cute quilting cotton for 1.50 a yard?!?! are you kidding me?!?!) so I could finish my buttony. This blue was not the color I had in mind, I was thinking a fun red or parakeet blue but those didn't look right, this pretty blue was it!
buttony buttons!

+

toasty mitts for me.
toasty mitts
I feel like I am always crafting for me. but seriously these are awesome, I am glad they are mine. I am working on another pair for a Christmas gift so maybe I am not totally selfish?

Pattern: toasty
yarn: cascade 220 in dark gold heather (I still have tons left from my lace panel cardi, such a good color to have around)

toasty mitts

toasty mitts

Wednesday, October 7

printables...ahhhh

printables
above is little hello notecards and assorted gift tags (so cute) wrapped up for gifts

I scored a sweet COLOR scanner/copier/printer at a garage sale a few weeks back. I am so pumped that now I can print pretty pretty things in COLOR! I never ever looked at the printables section of one pretty thing because I knew it was just going to make me soooo mad I didn't have a color printer. But now I can LOOK LOOK LOOK and then PRINT PRINT PRINT! woot woot!

here are some pretty things I like:

apple stationary
photo borders
gift jam labels
12 different colors of thank you cards
a little hello notecards (pictured above)
smiling star (perfect for kids birthday cards)
cupcake wrappers!
flower stationary (i have no idea what I would use this for but i just love it)
birdie notecards
flower postcard
assorted gift tags (pictured above)
Christmas gift labels
halloween note cards
black apple halloween note cards
fall themed cupcake wrappers


Eeeek I am going to run out of ink!

Monday, October 5

obsess much?

Thank you for the orange quilt love. I had a pretty good time making that one.

knitted hats
I went from never wanting to knit a hat to not being able to stop. I was thinking of making hats for my friends kids for Christmas. How fun would that be? I could try out different patterns and yarns!! However, after realizing it is extremely hard to make hats for little people because who knew they each have such different head sizes and the darn hats don't fit (I feel like a big dork when a present doesn't fit). So I will stick to making hats for babies, who can grow into them if they don't fit, and for my girl. I thought for sure Lilly was going to be super excited for her blue hat but after trying it on and giggling (hmmm), I have yet to get it on her head again. We lost her favorite hat which was too small anyway so I am hoping by default she will wear this one.

knitted hats

Patterns: The three ear flap hats are each sized down from the adult kittyville hat pattern (also found in Stitch and Bitch Knitting. See my rav project page for the mods.

The little baby hat is the umbilical cord hat (rav link) from Stitch and Bitch Knitting.

Yarn: Lion Brand Pound of Love in denim (this yarn can be found for 5 bucks on sale and is very forgiving and washable, good for baby mamas)

I didn't want to knit hats because of those dreaded double pointed needles but they are not so bad. I like the bamboo needles because they are light. I have a pair of double pointed needles (my grandmas) I am using for a Christmas gift and they are so hard to work with because they are a heavy metal and the yarn is delicate. However, I am enjoying making a few pairs of toast/toasty gloves. So far I have one glove done in each pattern. One pair is for me and I hope to get crackin' on that second one soon, I need them in the mornings! I actually have quite a bit going on including a couple birthday presents, the kind of busy week I like to have!

toast/toasty